Help:Editing
Here's how to edit things. If you don't use the top bar, then follow this guide:
Text editing
Text is the major thing of wikis. Two apostrophes (on both sides) make italic text, three apostrophes makes bold, and five apostrophes makes both.
Code:
''Two'' apostrophes (on both sides) make italic text, '''three''' apostrophes makes bold, and '''''five''''' apostrophes makes both.
Images
To add images, add two square brackets (on both sides) of a file. Go to Special:Upload and then get your filename (Yes, including File:).
Code:
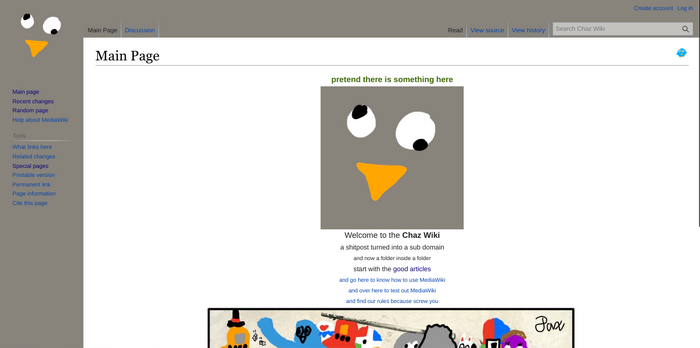
[[File:Chaz Wiki on 5-25-25.png]]
Very big, isn't it? After the filename comes some things to decide:
[[File:Chaz Wiki on 5-25-25.png|1|2|3|4|5]]
After the filename comes the size in pixels (1). After so is the format (2). It comes in four types:
thumbshows an image like a thumbnail (and is by default sized to your preferred one) (+ media viewer),framelessshows an image without a thumbnail ridging,frameshows an image as big as large as can be (with no media viewer), and;nonemakes it a plain HTML image.
After the format is the alignment (3) (left, center, right, or it is not specified), and then the alt (4) (always alt= before it), which should be the same as what comes after, the caption (5). There's actually a hidden sixth one, the link (6), done like the alt, but with a link after (always link=, then the link). So let's learn how to use links.
Code:
[[File:Chaz Wiki on 5-25-25.png|700px|thumb|center|alt=Chaz Wiki's main page|Chaz Wiki's main page]]
Links
Links are done with 2 square brackets (on both sides) around text that has an article, for example: Chaz is done with [[Chaz]]. You can also add a pipe divider (the long line that isn't a lowercase "L" or uppercase "i", |) and then some link text, you will have a labelled link. Peepy doesn't link to Peepy, look here: [[Peep|Peepy]].
Links that are red, for example: Teen titans go is done with [[Teen titans go]] (don't make that article) do not exist. To create a nonexistent article (don't use the example red link here, though), you can just click it. Pages can also be blanked and can become redirects, which requires using #REDIRECT and then putting a link with no label next to it.
External links
External links can be done in multiple ways. You can make a fake citation by using the HTTPS:// protocol before the website URL and putting 1 square bracket (on both sides) around it. [1] is done with [https://example.com]. You can also put the URL with the HTTPS:// protocol without the brackets to show the URL, like this: https://example.com. That's just by itself. If you add before the 1 end bracket a space, then some stuff, you will have a labelled external link. [https://example.com Example website] makes Example website.
Headers
A level one header is done with one equal sign before and after your header text: =like here=.
A level two header is done with two equal signs before and after your header text: ==like here==, and so on.
Lists
Lists can be done two ways, ordered (like <ol></ol>), and unordered (like <ul></ul>).
Ordered lists are done with hashtags (#), a space, and then content afterwards. Unordered ones use asterisks instead (*). When making a list, items are done without extra enters, so no:
- Hello!
- Hello? Why am I 1 too?
It's:
- Hello!
- Howdy!
Coding
To code, use <code> before and </code> after your code line. If you need a series of code lines, use <pre> before and </pre> after your scripts. If you need to use Wikitext demo code, like in this guide, use <nowiki> before and </nowiki> after your now-disabled Wikitext.
If you need to use HTML tags, here are the only ones that work:
- The <big> tag makes things big.
- The <small> tag makes things small.
- The <sup> tag makes things superscript.
- The <sub> tag make subscript.
- The <br> tag makes breaks in texts. This can otherwise be done using two enters, 1 before your content, 1 where you'll write it:
Stuff. <br> Seconds!
makes:
Stuff.
Seconds!
- The <span> and <div> tags work as they do in HTML. Look at the Main Page!
- The <center> tag works!
The <center> tag works! - There's a convenient {{color}} template: Swap's name is often put in magenta color.
- The <abbr> tag abbreviates stuff. (
<abbr title="Capitol Hill Autonomous Zone">CHAZ</abbr>--> CHAZ) It also works to add hidden messages in articles, but they have to be decently small.
Gallery
Using <gallery> before and </gallery> after a series of images like this:
<gallery>
Thechaz.png|[[Chaz]]
Peep.png|[[Peep]]
RedSyver.jpeg|[[Red]]
Prince.jpeg|[[Prince]]
Cubeor.png|[[Cubeor]]
Peepy.jpeg|[[Peepy]]
</gallery>
makes this:
Tables
The hardest one of all...
To make a table, you need to start by using this:
{| class="wikitable"
|+ Caption text
|-
! Header text !! Header text !! Header text
|-
| Example || Example || Example
|-
| Example || Example || Example
|-
| Example || Example || Example
|}
Here's an explanation (oh boy):
{| class="wikitable"makes the table.|+creates caption text.|-creates a table line, the divisor between table cells. It goes between everything, besides the top and bottom and the 2nd and 2nd-to-last rows.!starts a header row.|starts a normal row.
The double pipes (||) makes a column.
A row goes left to right and is put up and down.
A column goes up and down and is put left to right.
Talk pages
When talking to someone on a talk page, you should use a signature. It's a line of text telling everyone else who you are, when you posted, and a link to your user page. To use a siggy, put --~~~~, which should create something like this:
yada yada nada --Username (talk) 15:54, 10 June 2009 (UTC)
... or something like that. You can also use ~~~ to give just your siggy:
yada yada nada Username (talk)
... or something like that. You can edit your signature in your preferences.
To indent, you can use a certain amount of colons (:) to indent, like this:
Normal text
- Indent!
- Double colon! (Wait wha...)
Code:
Normal text
:Indent!
::Double colon! (Wait wha...)
I think that's all. If there's anything- oh!
Actual Wikipedia-ing
When doing Wikipedia stuff, as in, making smart stuff, you can use this thing:
We should fight for our rights because, as Ezra Pound said,
If a man isn't willing to take some risk for his opinions, either his
opinions are no good or he's no good.
The code for that is this:
We should fight for our rights because, as <cite>Ezra Pound</cite> said,
<q>If a man isn't willing to take some risk for his opinions, either his
opinions are no good or he's no good.</q>
When getting this stuff, you should (I haven't) use citations, like this random piece of evidence I found:
As quoted after his arrest for treason; The Story of Disloyalty and Betrayal in American History by Nathaniel Weyl (1950), p. 400
How would I put it there though...
Well, I could do this: [1].
That is <sup><abbr title="As quoted after his arrest for treason. Weyl (1950), p. 400>[1]</abbr></sup>.
See that? If we had a URL, we could do this:
[2]
You can make a references section for evidence, like this:
== References ==
#: As quoted after his arrest for treason. Weyl (1950), p. 400
#: https://libquotes.com/ezra-pound/quote/lbq7d4s
Now I think this is it.
If you have any questions, see Help:FAQ.
